


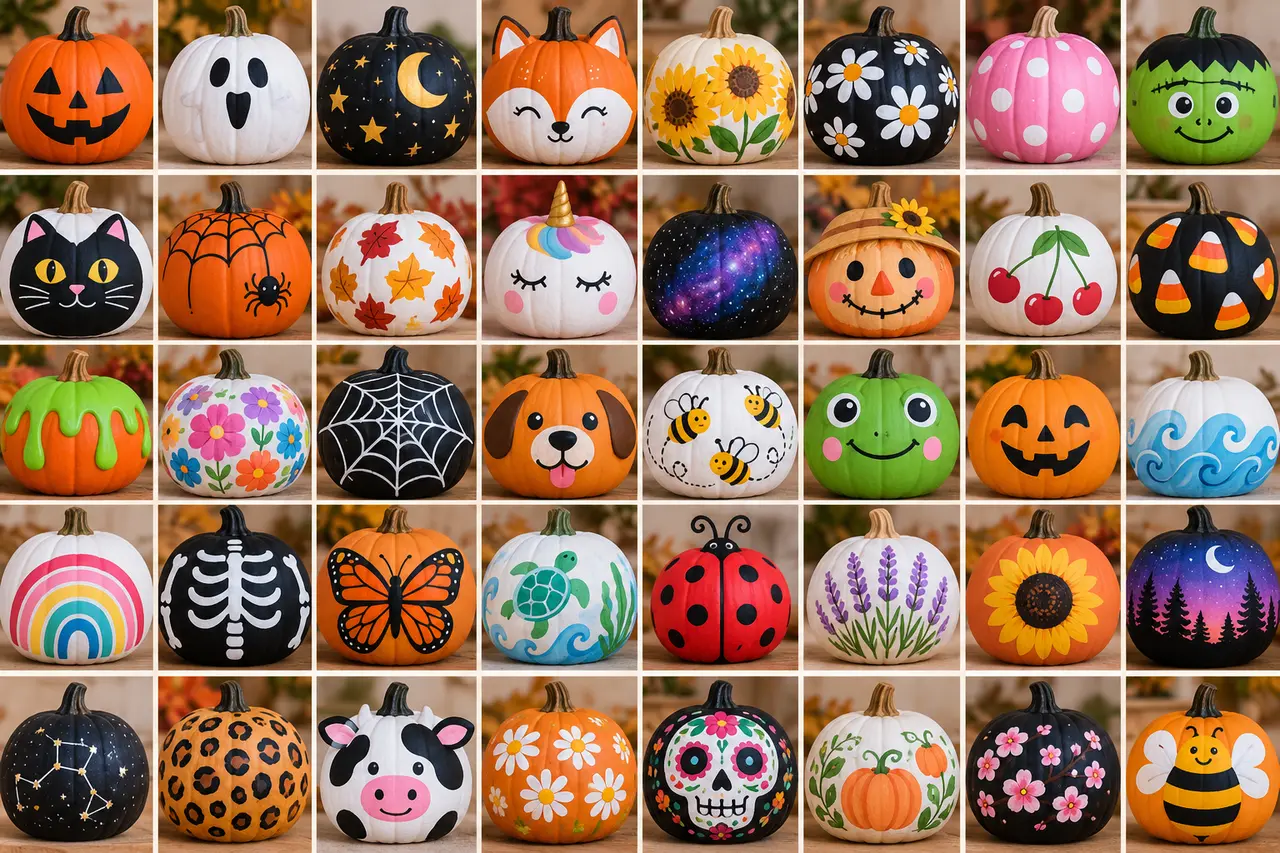
Pumpkin painting is one of the easiest ways to decorate for fall or Halloween without carving. You can turn a real or craft pumpkin into a ghost, cat, floral centerpiece, colorful abstract design, or elegant piece of fall décor using little more than paint and a few basic supplies.
The best pumpkin painting ideas also work across skill levels. Kids can make fingerprint faces and polka dots, beginners can follow the pumpkin’s natural ridges to create stripes, and experienced painters can try florals, landscapes, shading, or detailed characters.
Below are more than 45 ideas, organized by style and difficulty, followed by practical tips for getting cleaner lines and better coverage.
Quick Pumpkin Painting Ideas at a Glance
If you want to choose a design before gathering supplies, start here.
| Pumpkin painting idea | Difficulty | Best colors | Good for |
|---|---|---|---|
| Polka dots | Very easy | Any combination | Kids and beginners |
| Colorful stripes | Easy | Bright or pastel colors | Fall décor |
| Ghost face | Very easy | White and black | Halloween |
| Black cat | Easy | Black, white, pink | Halloween |
| Dripping paint | Easy | Neon or contrasting colors | Parties |
| Rainbow | Easy | Rainbow colors | Kids |
| Floral pumpkin | Medium | Pink, green, cream | Elegant décor |
| Plaid pumpkin | Medium | Orange, cream, black | Farmhouse décor |
| Starry night | Medium | Navy, white, gold | Halloween |
| Botanical leaves | Medium | Green, gold, beige | Fall centerpieces |
| Mini landscape | Advanced | Blues, greens, oranges | Artistic display |
| Portrait or character | Advanced | Varies | Themed decorating |
Acrylic craft paint is a convenient option for many painted craft projects because it dries relatively quickly and comes in a wide range of colors. Current craft projects from Michaels, for example, use acrylic paints for striped, multicolor, metallic-accented, and Halloween pumpkin designs.
Easy Pumpkin Painting Ideas for Beginners
You do not need drawing skills to create an attractive painted pumpkin. Patterns, simple shapes, and the pumpkin’s existing grooves do much of the work for you.
1. Classic Polka-Dot Pumpkin
Paint the pumpkin one solid color, then cover it with evenly spaced dots. Use the round end of a foam dauber, cotton swab, or small brush to keep the dots consistent.
Try black dots over orange for Halloween, gold over cream for fall décor, or several bright colors for a playful look.
2. Striped Pumpkin
Use the pumpkin’s natural grooves as guides and paint alternating sections in contrasting colors. This avoids the challenge of drawing perfectly straight lines across a curved surface.
Following the natural creases is also a technique used in Michaels’ striped pumpkin project, where the grooves help keep painted lines consistent.
3. Color-Block Pumpkin
Divide the pumpkin into two, three, or four large areas. Paint each section a different color.
For a modern look, combine terracotta, cream, sage green, and dusty pink instead of traditional Halloween colors.
4. Paint-Swatch Pumpkin
Cover the pumpkin with irregular brushstrokes in several colors. Let one color dry before partially overlapping it with another.
This technique requires very little precision and creates an intentionally artistic finish. A similar beginner project from Michaels builds the design by layering individual painted color swatches.
5. Sponge-Painted Pumpkin
Dip a small sponge lightly into paint and dab it across the pumpkin rather than brushing it on.
Layer two or three shades to produce a textured appearance. Metallic paint over a dark base can make the texture especially noticeable.
6. Confetti Pumpkin
Paint tiny rectangles, circles, triangles, and dashes in assorted colors. Scatter them randomly instead of trying to create a symmetrical pattern.
This is particularly forgiving because irregular spacing becomes part of the design.
7. Drip-Paint Pumpkin
Paint the pumpkin a solid base color. Once dry, apply a contrasting color around the top and allow controlled drips to run downward.
Black over orange creates a Halloween look, while gold over white makes the same technique suitable for an autumn centerpiece.
8. Paint-Pour Pumpkin
For an abstract design, place the pumpkin on a raised disposable surface and pour contrasting colors over the top.
Protect the work area carefully because excess paint will run off the pumpkin. Michaels uses this approach for a beginner black-and-white pour project and recommends allowing the finished pumpkin to dry overnight.
Cute Pumpkin Painting Ideas
Cute pumpkins work particularly well on porches, classroom displays, children’s rooms, and family Halloween setups where you want something friendlier than traditional scary decorations.
9. Pink Cheek Pumpkin
Give your pumpkin two simple eyes, a small curved mouth, and round pink cheeks.
Leave the pumpkin orange or paint the entire surface cream, pastel pink, or white first.
10. Sleeping Face Pumpkin
Draw two closed eyes with curved eyelashes. Add a tiny mouth or leave the face minimal.
A pale pink, cream, lavender, or light blue base gives the pumpkin a softer appearance.
11. Bumblebee Pumpkin
Paint alternating yellow and black stripes around the pumpkin. Add large eyes and attach lightweight craft wings if desired.
Mini pumpkins work especially well for this design.
12. Ladybug Pumpkin
Cover a small pumpkin in red paint and add black dots. Paint the section around the stem black to create the ladybug’s head.
Two white dots inside the black area become simple eyes.
13. Strawberry Pumpkin
Paint the pumpkin bright red or pink and add small yellow seed shapes across its surface. Paint green leaves around the stem.
The pumpkin’s naturally rounded shape makes this design recognizable with surprisingly little detail.
14. Watermelon Pumpkin
Use pink as the main color, then add scattered black seed shapes. Paint green around the bottom or upper portion to represent the rind.
15. Donut Pumpkin
Paint a ring of pink, chocolate brown, or white “icing” around the pumpkin and add colorful sprinkles.
A mini pumpkin makes an especially convincing oversized donut decoration.
16. Ice-Cream Pumpkin
Turn an upside-down mini pumpkin into a scoop of ice cream by painting it pink, vanilla, chocolate, or mint. Add chocolate chips or sprinkles, then place it above a decorative cone made from cardstock.
Pumpkin Painting Ideas for Kids
Children’s pumpkin designs work best when the project does not depend on perfect outlines. Fingerprints, handprints, large shapes, and expressive faces allow each pumpkin to look intentionally different.
17. Fingerprint Pumpkin
Let children dip a fingertip into washable craft paint and cover the pumpkin with colorful fingerprints.
Once the prints dry, some can be transformed into tiny spiders, flowers, insects, or faces using a marker or fine brush.
18. Rainbow Pumpkin
Paint broad rainbow bands from the stem toward the bottom.
Older children can create narrow, even stripes, while younger children can simply paint each pumpkin ridge a different color.
19. Monster Face Pumpkin
Paint mismatched eyes, crooked teeth, eyebrows, and funny expressions.
There is no need for symmetry. In fact, uneven features usually make the monster more entertaining.
20. Emoji Pumpkin
Start with a yellow pumpkin and recreate a familiar facial expression using simple black, white, red, or pink shapes.
Choose designs with large features rather than complicated details.
21. Animal Face Pumpkin
Transform pumpkins into foxes, pandas, bears, rabbits, frogs, or cats.
Paint the main facial markings first. Ears can be added with cardstock or felt if the design needs them.
22. Handprint Spider Pumpkin
Paint a child’s palm and four fingers, then press it carefully against the pumpkin. Make a second print facing the opposite direction to form eight spider legs.
Add eyes once the handprints dry.
23. Name Pumpkin
Paint each child’s name in large letters and let them decorate the surrounding space with dots, stars, hearts, or fingerprints.
These pumpkins can double as personalized fall decorations.
Halloween Pumpkin Painting Ideas
Paint can create Halloween decorations ranging from cheerful ghosts to dramatic gothic designs, without removing the pumpkin’s top or carving through the shell.
24. Classic Jack-o’-Lantern Face
Paint triangular eyes, a nose, and a toothy grin in black.
From a distance, it resembles a carved jack-o’-lantern while remaining completely intact.
25. Friendly Ghost Pumpkin
Paint the entire pumpkin white and add oval black eyes and a small mouth.
For a more detailed version, paint several tiny floating ghosts around a dark pumpkin.
Ghost-and-pumpkin painting also appears in current beginner Halloween craft projects, showing how easily the two motifs can be combined.
26. Black Cat Pumpkin
Paint the pumpkin black and add green or yellow eyes, whiskers, a pink nose, and triangular ears made from painted cardstock.
27. Spiderweb Pumpkin
Paint the pumpkin black, dark purple, or navy. Use white or metallic paint to draw intersecting web lines.
Place a small painted spider near the stem or along one side.
28. Eyeball Pumpkin
Paint the pumpkin white, then add a large colored iris and black pupil to one side.
Thin red lines around the eye can make the design creepier.
29. Skeleton Pumpkin
Paint a simplified skull face on a white pumpkin using black eye sockets, a triangular nose, and short vertical lines across the mouth.
30. Vampire Pumpkin
Give the pumpkin slick black hair, dramatic eyebrows, red lips, and two white fangs.
A small streak of red beneath one fang adds a classic vampire detail.
31. Witch Pumpkin
Paint a green face with black eyes, a crooked smile, and a few exaggerated warts. Finish it with a miniature witch hat.
32. Haunted House Pumpkin
Paint a black haunted-house silhouette against an orange, purple, or sunset-colored background.
Small yellow windows create contrast and make the silhouette readable from farther away.
33. Moon and Bats Pumpkin
Paint a large cream or yellow moon on a dark blue pumpkin, then surround it with tiny black bat silhouettes.
Keeping the bats simple makes the design easier than it initially appears.
Aesthetic and Trend-Inspired Pumpkin Designs
Painted pumpkins do not have to look like Halloween decorations. Changing the palette can turn the same pumpkin into décor suitable for an entryway, dining table, bookshelf, or fall wedding.
34. Neutral Minimalist Pumpkin
Paint pumpkins matte cream, beige, taupe, or warm gray.
For more visual interest, group several pumpkins in slightly different neutral shades instead of decorating each one individually.
35. Sage Green Pumpkin
Sage green provides a softer alternative to orange while still working with natural fall colors.
Pair it with cream pumpkins, dried leaves, wood, and warm brown accents.
36. Gold-Accent Pumpkin
Start with a cream, white, or dark base and apply metallic gold to the stem, grooves, dots, or leaf motifs.
Metallic-painted leaves can also be attached as decorative accents. Michaels demonstrates a similar approach using white acrylic, gold-toned paints, and painted leaves.
37. Checkerboard Pumpkin
Paint a grid of alternating squares around the pumpkin.
Black and white feels graphic and modern, while rust and cream create a softer fall version.
38. Retro Wavy Pumpkin
Cover the pumpkin with thick wavy lines in colors such as mustard, burnt orange, brown, cream, and olive.
The pattern works especially well on a white base.
39. Celestial Pumpkin
Paint moons, stars, constellations, and tiny dots across a navy or black pumpkin.
Gold, silver, and white provide strong contrast against the dark background.
40. Disco Pumpkin
Paint the pumpkin silver, then create small mirrored-looking squares using white, gray, and metallic tones.
You can also use pink or lavender as the base for a more colorful version.
Elegant Fall Pumpkin Painting Ideas
If the pumpkin will be used as part of a centerpiece rather than Halloween décor, botanical patterns and muted colors usually integrate more naturally with table linens, flowers, candles, and greenery.
41. Floral Pumpkin
Paint large flowers around the pumpkin’s center or concentrate a small bouquet around the stem.
Instead of painting every petal identically, vary the size and direction of the flowers so the arrangement wraps naturally around the pumpkin.
42. Botanical Leaf Pumpkin
Paint eucalyptus-style leaves, vines, ferns, or simple branches over a neutral background.
Fine leaves look particularly clean on cream, beige, navy, or muted green pumpkins.
43. Fall Foliage Pumpkin
Paint scattered maple, oak, or simple oval leaves in burnt orange, mustard, burgundy, brown, and gold.
Allow some leaves to overlap for a layered appearance.
44. Plaid Pumpkin
Paint broad vertical and horizontal stripes, then add thinner intersecting lines once the first layer dries.
Use cream and tan for farmhouse décor or orange, black, and white for Halloween.
45. Monogram Pumpkin
Paint a large initial in the center of the pumpkin and surround it with a border of leaves, dots, or flowers.
This works well for an entryway or Thanksgiving table.
46. Blue-and-White Porcelain Pumpkin
Paint a pumpkin white and add delicate blue vines, flowers, leaves, or ornamental shapes.
Repeating a few simple motifs is usually more effective than trying to cover every inch with detail.
Artistic Pumpkin Painting Ideas
For painters who want a more challenging project, the pumpkin can function almost like a three-dimensional canvas.
47. Sunset Pumpkin
Blend yellow near the horizon into orange, pink, purple, and dark blue.
Once the gradient dries, add silhouettes of trees, bats, or distant hills.
48. Starry-Night Pumpkin
Paint a deep blue background, then layer lighter blue swirls and small white stars.
Varying the size and brightness of the stars creates more depth than making every dot identical.
49. Mini Landscape Pumpkin
Paint a landscape around the pumpkin so the scene continues as the viewer turns it.
Mountains, pine forests, autumn trees, cottages, and lakes are all suitable subjects.
50. Mushroom Forest Pumpkin
Create clusters of red, brown, cream, and orange mushrooms among tiny plants and leaves.
A dark green or cream background can make the illustration feel like a woodland scene rather than a Halloween decoration.
51. Folk-Art Pumpkin
Use symmetrical flowers, birds, hearts, leaves, and vines in a limited color palette.
Sketch the central motif lightly before painting so the design stays balanced.
52. Textured Pumpkin
Instead of relying entirely on flat color, use thicker painting techniques to create visible texture.
Texture can emphasize leaves, flowers, stems, or abstract shapes. For example, Michaels’ textured pumpkin art project mixes acrylic color with modeling paste and applies it with a palette knife to build raised strokes.
What Paint Should You Use on a Pumpkin?
Acrylic craft paint is a practical starting point for decorative pumpkin painting because it is available in many colors and works well for common craft techniques. Acrylic products vary, however, so check the manufacturer’s surface and outdoor-use instructions rather than assuming every acrylic formula performs identically.
For example, DecoArt describes its Americana Acrylics as water-based, fast-drying craft paint but specifically notes that this particular product line is not approved for outdoor use. Its listed drying information also distinguishes between touch-dry time and full curing time.
| Material | Best use | Main consideration |
|---|---|---|
| Acrylic craft paint | General pumpkin designs | Easy color mixing and layering |
| Paint markers | Letters and small details | Easier control than a brush |
| Metallic acrylic | Elegant accents | Strongest over a contrasting base |
| Sponge + acrylic | Textured backgrounds | Produces less precise edges |
| Pouring paint | Abstract pumpkins | Messier and needs protected workspace |
| Fine brush + acrylic | Florals and illustrations | Requires more control |
For children, choose age-appropriate art materials and follow the product label. Protect clothes and work surfaces even when using water-based products.
How to Paint a Pumpkin Step by Step
Start with a pumpkin that has a firm surface and no obvious soft or damaged areas. Gently clean away dirt and allow the surface to dry completely before painting.
Next, decide whether the natural orange color will be part of the design. If not, paint a base coat and let it dry before adding details. Some colors may require additional coverage depending on the paint, pumpkin color, and effect you want.
Lightly sketch complicated designs before committing to paint. For stripes, use the pumpkin’s grooves as built-in guides. For geometric designs, work in small sections rather than attempting to draw a long line around the entire curved surface.
Allow painted sections to dry before adding overlapping details. Michaels’ multicolor pumpkin instructions similarly recommend letting individual colors dry before adding subsequent overlapping swatches.
Finally, place the pumpkin somewhere it can finish drying without being handled. Drying and curing times depend on the particular paint and environmental conditions, so follow the instructions for the product you use.
How to Make a Painted Pumpkin Look Better
A few design decisions can make a simple pumpkin appear much more polished.
Limit the color palette first. Three or four coordinated colors often create a stronger design than ten unrelated colors. You can also repeat the same palette across several pumpkins while giving each one a different pattern.
Use the pumpkin’s shape instead of fighting it. Grooves naturally create stripes, the stem provides a focal point for floral designs, and the rounded sides suit faces, moons, flowers, and large illustrations.
Scale matters too. Tiny details disappear when a pumpkin is viewed from across a room or porch. If the pumpkin is primarily decorative, make the main shapes large enough to remain recognizable at its intended viewing distance.
For a coordinated group, vary pumpkin sizes while repeating one feature, such as the same gold accent, color palette, botanical motif, or stripe.
Common Pumpkin Painting Mistakes to Avoid
Painting immediately after washing the pumpkin can cause problems because moisture remains on the surface. Let it dry first.
Another common mistake is repeatedly brushing over partially dried paint. This can disturb the layer underneath and produce an uneven finish. Allow one layer to dry before making corrections or adding overlapping details.
Avoid starting an intricate pattern without considering the pumpkin’s curves. A design that looks simple on flat paper may distort when wrapped around a pumpkin. Sketch major reference points first.
Finally, consider where the finished pumpkin will be displayed. Not every craft paint is intended for outdoor exposure, so check the paint manufacturer’s directions if the decoration will sit outside.
How to Choose the Right Pumpkin Painting Idea
Match the design to the amount of time and precision you actually want to spend.
For a project under an hour, choose polka dots, faces, stripes, color blocks, fingerprints, or broad abstract brushstrokes. For a family activity, designs that allow individual variation, such as monsters or rainbow pumpkins, prevent everyone from needing to reproduce the same pattern.
For table décor, neutral colors, botanicals, metallic details, plaid, and florals are easier to coordinate with the rest of the room. For Halloween night, high-contrast designs such as ghosts, skulls, cats, bats, and spiderwebs remain visible from farther away.
If you are creating several pumpkins, do not make every one equally detailed. One intricate centerpiece surrounded by simpler striped, solid, or dotted pumpkins usually creates a more cohesive display.
FAQs About Pumpkin Painting
Do you need to prime a pumpkin before painting it?
Not necessarily. Many simple craft designs can be painted directly onto a clean, dry pumpkin. A painted base coat can still be useful when you want to completely hide the natural orange surface or create a uniform background for detailed artwork.
What are the easiest pumpkin painting ideas for beginners?
Polka dots, stripes, color blocks, simple faces, paint swatches, and fingerprints require very little drawing ability. Following the pumpkin’s natural grooves can also make striped designs easier.
Can children paint pumpkins?
Yes. Pumpkin painting can avoid the cutting involved in carving, but children should still use age-appropriate craft materials with suitable adult supervision. Follow the safety and age instructions on paints, scissors, adhesives, and decorative materials.
How long does pumpkin paint take to dry?
It depends on the product, paint thickness, temperature, and humidity. Some craft acrylics can become touch-dry relatively quickly while taking considerably longer to cure fully. Always use the manufacturer’s instructions for the specific paint rather than relying on a universal drying time.
Can you paint artificial pumpkins?
Yes. Craft pumpkins are useful when you want decorations that can be stored and displayed again. Check that the paint you choose is compatible with the artificial pumpkin’s surface, since craft pumpkins can be made from different materials.
What colors look best on painted pumpkins?
Orange, black, cream, white, gold, and burgundy suit traditional autumn and Halloween decorating. Sage, dusty pink, navy, lavender, terracotta, and beige create a more contemporary look. Rather than choosing colors individually, select three or four shades that work together and repeat them throughout the display.
Final Ideas for Your Painted Pumpkins
The most successful pumpkin painting idea is usually one that matches the setting and your available time. A few black stripes can turn an ordinary orange pumpkin into graphic Halloween décor, while cream paint, botanical leaves, or metallic accents can transform the same shape into an elegant fall centerpiece.
Beginners can start with dots, stripes, ghosts, rainbows, or color blocks. If you enjoy detailed painting, move into florals, celestial scenes, landscapes, folk-art patterns, or textured designs. And when decorating several pumpkins, treat them as one collection: repeat colors and motifs while varying the size and complexity of each design. That approach creates a display that looks coordinated without requiring every pumpkin to match.
For more helpful guides please visit RoyalSprinter.
