


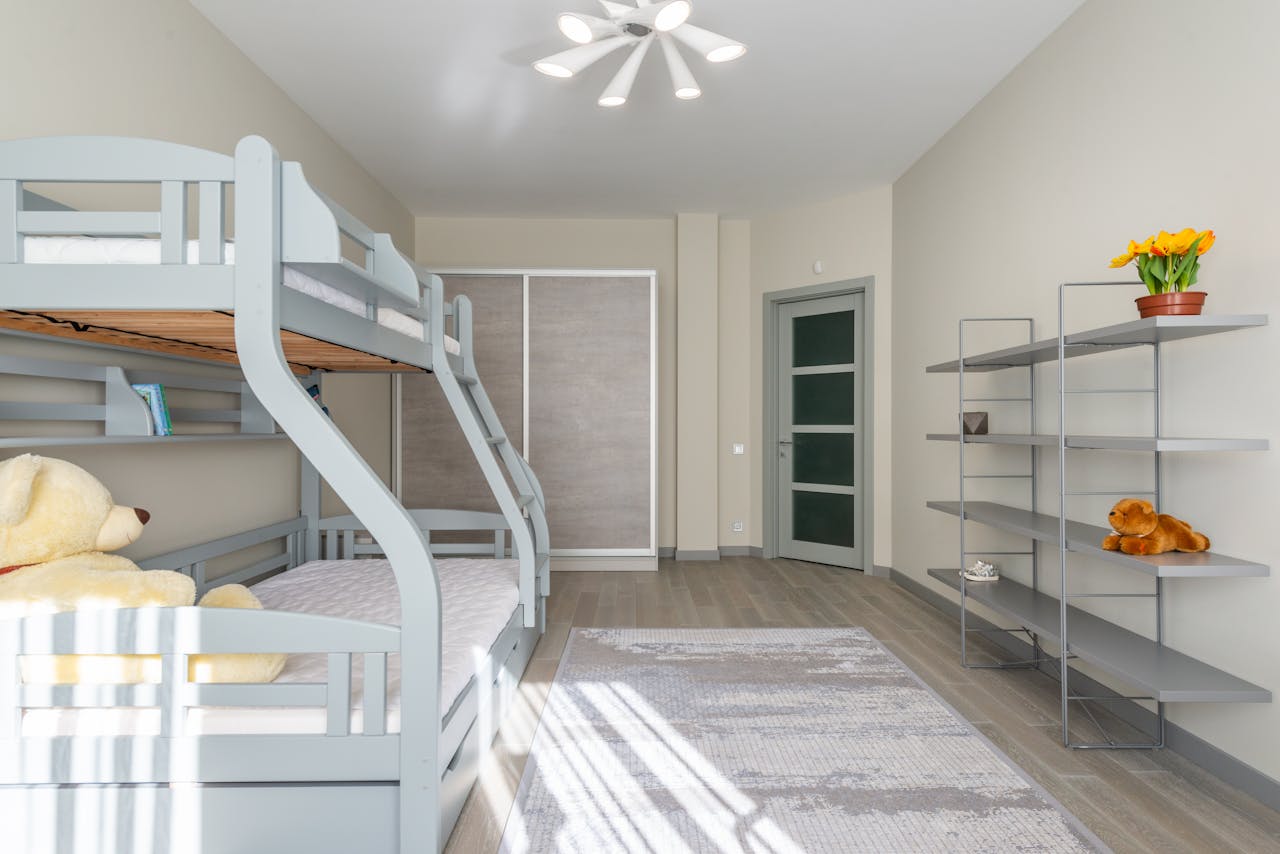
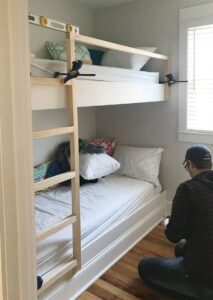
Sharing the fully finished built-in bunk beds we created in the bunk room at our beach cottage makes us very happy. This is a little chamber, just 7ft wide! But by do-it-yourself custom built-in bunks, we squeezed two XL twin beds in here. Our children now choose them not only for sleeping but also for play and hanging out!
Unlike making a bookcase or a table, I was a bit anxious about this endeavor. This is a bed that truly floats in the air so one person may sleep on top of another (or the rare chihuahua). However, spoiler alert: this is quite simple to implement and absolutely strong and robust!
The room consists of 81-inch width, a wall-to-wall 80-inch twin XL mattress would fit perfectly. We came to this realization throughout the restoration, and it was how we thought a little bunk room would look fantastic. Yes, there are two other bedrooms for the children to utilize, but this project was a no-brainer given the novelty and fun-factor of built-in bunk beds. But the area has only looked like this for the past few months:
Materials and Supplies Required
Our idea calls for building two floating platforms joined by a ladder. We could put three of the four sides of the platform exactly into the wall studs since this room is so small and the mattresses fit so well. This produces an amazing degree of sturdiness and eliminates the need for any vertical supports or posts.
- 2×4″ boards
- 1/2″ plywood panels (for tops of platforms)
- 1/8″ plywood panels (for underside of upper platform)
- Primed 1×8″ boards
- 2×2″ pine boards (for railing & ladder)
- Primed lattice strips
- Baseboard (can reuse existing)
- 4″ and 5″ structural screws
- Miter saw
- Circular Saw
- Power drill
- Nail gun
- Stud finder
- Bar clamps
- Pocket hole jig (optional)
- Long levels
Not including beds and bedding, our overall expenses for our given space came to roughly $250.
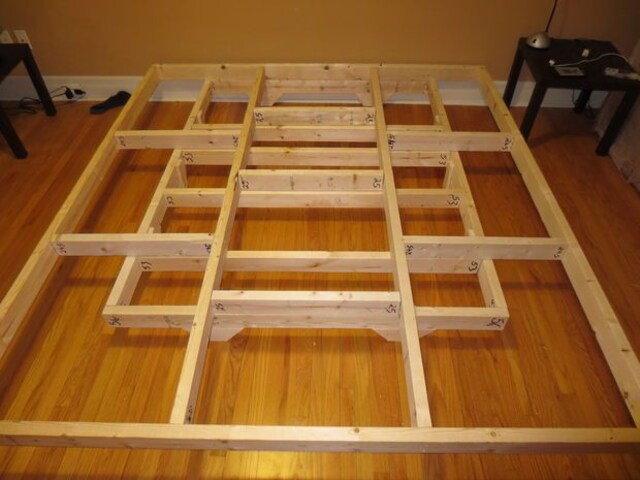
Step 1: Create the Bottom Bunk Beds Platform
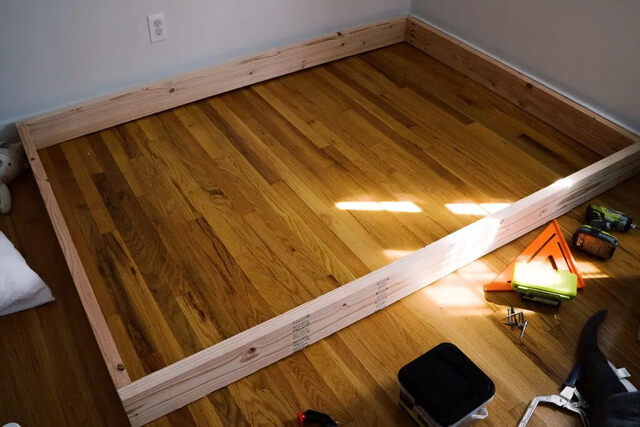


Originally we wanted to maximize headroom for every bed by building the first mattress platform straight on the floor. We eventually chose to increase it somewhat for aesthetic reasons, but I’ll still show you this method since it provides a decent concept of how to design any platform. We also decided to construct them in situ for the most exact fit, therefore avoiding the need to move large wooden frames in the limited area.
We began by creating a mattress platform frame out of 2x 4′s. Going wall to wall, we cut our wood to exactly match the area. You can see us beginning to add below once the back and side sections were cut, cutting more short pieces to provide some cross bracing beneath the platform. You eventually want one every twelve inches.
I used my Kreg Jig to attach all of these as I do not own a frame nailer. It creates pocket holes in your wood that let you tightly attach parts. I definitely suggest one since I have lost count of how many projects I have used it for at this point.
Step 2: Elevating Our Bed Frame

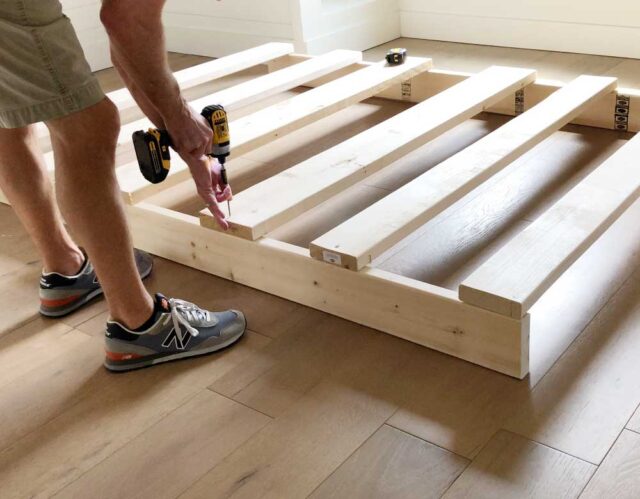
I added the fourth side of my frame across the front after the cross-braces was fastened.
After the structure was finished, we laid 1/2-inch plywood to form a stable surface the mattress could lay on. We just sized them with our circular saw and fastened them in place with our nail gun. Just be sure one of your cross braces rests where any seams between components rest.
This would have marked the end of the bottom platform, but the next morning we decided we wanted to raise it by a few inches off the floor. We reasoned that room to run baseboard across it would look nicer. We so turned around. We separated it enough to screw it somewhat higher up on the wall. Under our platform, we also included some 2x 4-inch legs to elevate it off the floor. Finally, we put a long 2×2 inch across the front so we would have somewhere to fasten the baseboard.
Though there is a lot going on in that picture, believe us. It was less complicated than it seems!
Step 3: Decide on Your Top Bunk Height

We had to decide a height before constructing the top bed platform. Standard 8-foot ceilings in our room led us to base our height choice mostly on:
- On both bunks, we aimed for headroom about equal.
- Think of bedtime stories: we wanted enough space on the bottom bunk for an adult to sit up without striking their hea.
- We wanted it crowded enough on the top bunk to discourage horseplay or jumping or attempts to stand up.
To achieve #2 and #3, we essentially raised the top bunk a little higher than halfway. We should be happy that we did since, as we mentioned above, raising the bottom bunk a little amount is not a major issue. We added the higher bed before adjusting the bottom bunk, as you will see below.
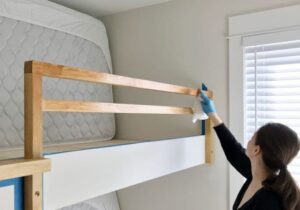
Step 4: Build Your Floating Top Bunk

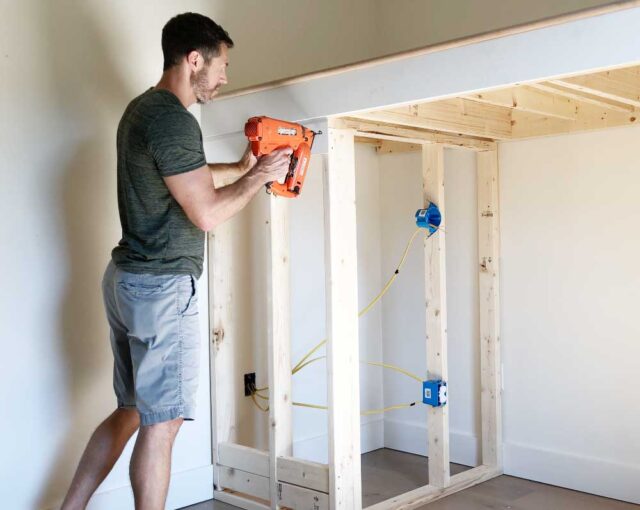
For the top bunk, we followed the same procedure but faced more difficulty fastening it to the wall without any vertical supports or “legs.” We accomplished this by depending on these heavy-duty “Rugged Structural Strength” screws fastened straight in the wall studs. They really are amazing.
Still installing them required some energy (have a look at the lunge!). specifically to ensure that every two by four-inch board pulled tightly into the stud. Still, they were far less complicated than heavy lag screws. Not necessary any pilot holes; my usual power drill worked.
Once more, the construction of the higher platform followed the same pattern as the bottom. And we fastened all of the two-by- four-inch boards to the three walls the platform contacts with those high strength screws. They also helped us to fasten the front piece to the remainder of the frame.
These bar clamps are the Robin to the heroes of this construction, if those Rugged Strength Screws are its Batman. They really helped to keep things in order during our attachment work.
Finally, we nailed down some 1/2‘-plywood panels beneath the platform to allow the mattress somewhere to rest. This was also an excellent moment to see how strong and solid the top bunk was!
That finishes the bones of these naturally occurring bunk beds. It’s time now to make them more attractive!
Step 5: Adding Trim and Molding

We nailed some pre-primed 1 x 8″ boards across the front of both platforms to dress up the exposed 2 x 4″ boards. Along the rear wall, we also restored the baseboard we had taken off, now in front of the bottom bed. These are the minute elements that really give built-in bunk beds their natural look!
To improve the view from the bottom of the top bed, we also included some thinner 1/8′-plywood to the underside. To complete things, we also framed the plywood’s edges (including across the central seam) with some lattice pieces. To be sure they would remain in place over time; we nailed all of this and used wood glue.
Eventually, all of this will be painted the match the rest of the trim in the room, let’s now focus on ladder building.
Step 6: Build Your Ladder

Our modern railing drew on these Studio McGee bunk beds. Their cleanliness and the blend of wood and white were appealing as well. We opted to replicate it using 2 x 2″ square pine wood from Home Depot.
Every rung is 18 inches wide, hence we cut them in groups to enable exact size control. For a solid hold, we fastened them into the vertical sections with the same Rugged Strength Screws. To ensure everything was evenly spaced, we also utilized scrap “spacing blocks” between the rungs (our rungs are 12″ apart from top to top, hence the spacers were 10.5“). Driving in the screw, I also rested on top another scrap piece of wood and pressed down to keep everything flush.
We also took great care to install the ladder on a level surface. We lay some waste MDF from another project under our ancient floors since they are not exactly flat.
Later on, we opted to double-up the rungs as the two x two-inch rungs were somewhat narrow beneath your foot. After the ladder was hugn, we cut longer 2×2″ pieces and screwed them in from the rear side across on the front of every rung. This also helped to somewhat increase the general safety of the building.
We also sanded every corner of the wood so they resembled a rounded square edge instead of a really razor sharp one.
Step 7: Attach the Ladder & Build the Railing

We clamped the ladder in place to get the proper alignment then fastened it to the frame with more of those heavy duty screws. We could start laying out the railing for the top bunk once the ladder was fastened.
More RSS screws allowed us to fasten the top rails from the topside. The little top rail on the wall side of the ladder is shown below. Although we had intended to position the ladder exactly against the wall, it would have interfered with the light switch. Rather, we floated it off a few inches, which is actually good as your hands could wrap around the side of the ladder. worked incredibly nicely.
Attached the same manner, the longer top rail on the other side entered the top of the ladder on one side and into a little vertical 2×2″ rail we included on the other. We then installed a second rail in the middle using pocket holes from the rear side so that it is not evident from the front.
Attached the same manner, the longer top rail on the other side entered the top of the ladder on one side and into a little vertical 2×2″ rail we included on the other. We then installed a second rail in the middle using pocket holes from the rear side so that it is not evident from the front.
The good news is that we thought the brass screw heads looked much better once everything was tarnished. You might also countersink your screws and cover the holes with wood putty if you find the appearance objectionable.
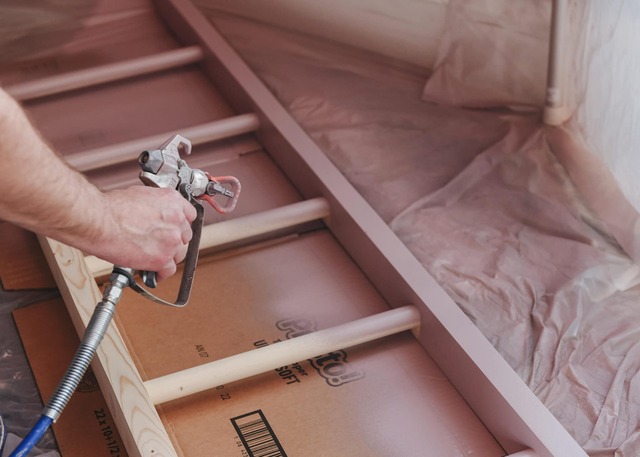
Step 8: Stain the Ladder and Railings

We wanted to match our floors, hence we had a very precise color in mind for the wood tones in here. After some experimenting on scrap pieces, we found a method for obtaining the desired look.
The resultant combination turned out to be a four-stage process:
- Pre-stain wood conditioner helps you produce more even, less blotchy results by coat-wise application.
- On all of the chopped ends, we lightly brushed Minwax Natural. We picked a lighter hue since the raw cut ends of wood boards tend to absorb WAY more dye, so they are darker in the end.
- Then, everywhere else, we covered Minwax Puritan Pine with a brush. We cleaned off the extra once it set for around fifteen minutes.
- After all that, it wasn’t quite red enough, so we quickly apply Minwax Colonial Maple everywhere with a rag to provide a faint reddish cast.
Though very complicated, we are rather pleased with how it ended out.
Step 9: Add Mattresses & Bedding!


We could at last decorate this lovely, little bunk room and show it to our eager kiddies with all of our paint and stain dried.
Like I mentioned in the beginning, they have fast grown to be the children’s preferred place in the house. Actually, one of Burger’s as well. Even now, he honored us with his presence as we were taking pictures. He then got right to start grooming himself.
Thanks to this little cube organizer shelf, we did eventually add some storage for toys and clothes few weeks after these built-in bunk beds were finished. This is plenty of space for children to hide their clothes since we just stay here on weekends and summer vacations.
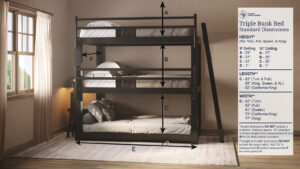
Final Measurements for Our Built-in Bunk Bed Construction
I also promised final measurements for our built-in bunk beds; hence, here they are all in one location for you:
- To fit an 80 x 38\” twin XL mattress, both platforms are 81.5 x 40\“.
- Top of the platform is 10″ off the ground, hence the mattress is 17″ off the ground with 34.5″ of headroom.
- The mattress is 63″ off the ground, with 32.5\” of headroom. Top of platform is 56\” off the ground.
- Ladder rungs are 18′-wide, hence the complete ladder spans 21′-width from edge to edge. Rungs run twelve inches from top to bottom.
- With a 3′-gap between the two, top railing is 7‘-above the mattress top (5′-needed).
Alright, and ultimately the whole procedure was about 88% less nerve-wracking than I had anticipated. Comparatively to building a deck or establishing an irrigation system, children’s play is rather different. This is a great advantage since our most current duplex plans call for comparable DIY bunk locations, hence we could have two additional sets of these on hand for ourselves. Better still buy my weight in those gold screws.
How to Make Built-in Bunk Beds – A Video Tutorial

Conclusion
Ultimately, building built-in bunk beds for small rooms is a sensible and space-saving fix that blends design appeal with use. You may maximize the available space and create a comfortable and fashionable sleeping room by closely planning the design, choosing the correct materials, and following exacting instructions. Whether your level of experience with do-it-yourself projects is new or seasoned, this complete guide provides all the materials and advice you need to create built-in bunk beds that exactly fit your small space. Accept the difficulty and savor the gratification of designing a personalized and functional living environment.
For more Informative articles you can visit our blog royalsprinter.com


